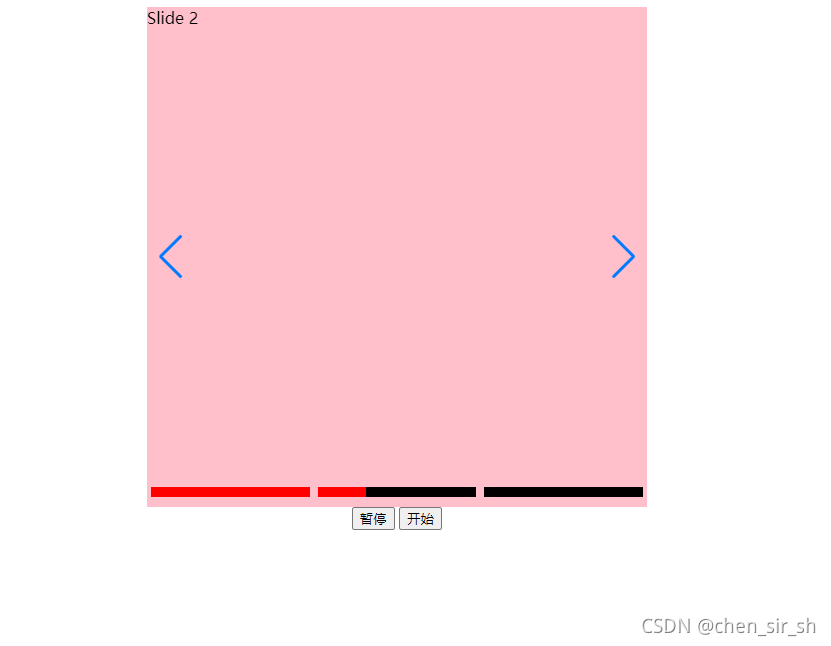
主要有两种填充效果。
第一种是通过css的动画效果,当轮播开始时,添加动画事件,思路如下
    .swiper-pagination-bullet-active{
        animation: progressbar linear 6s 1 forwards;
    }
    @keyframes progressbar {
        from {
            width: 0
        }

        to {
            width: 100%
        }
    }
设置动画时间为6秒。
但是这种方式只适合自动轮播的情况下,
如果添加按钮有其他触发事件控制轮播图时,就不太容易控制动画效果。
第二种时通过js的animate的函数来处理,基本思路:
当轮播初始化和切换时,使用animate函数在指定时间内进行填充,通过stop可以控制动画效果
完整代码如下所示,可以直接拿去用,含注释:
<!DOCTYPE html>
<html>

<head>
    <meta charset="UTF-8">
    <meta name="viewport" content="width=device-width, initial-scale=1.0">
    <meta http-equiv="X-UA-Compatible" content="ie=edge">
    <title>Document</title>
    <script src="https://code.jquery.com/jquery-3.6.0.js"
        integrity="sha256-H+K7U5CnXl1h5ywQfKtSj8PCmoN9aaq30gDh27Xc0jk=" crossorigin="anonymous"></script>
    <link rel="stylesheet" href="https://unpkg.com/swiper/swiper-bundle.css">
    <link rel="stylesheet" href="https://unpkg.com/swiper/swiper-bundle.min.css">
    <script src="https://unpkg.com/swiper/swiper-bundle.js"> </script>
    <script src="https://unpkg.com/swiper/swiper-bundle.min.js"> </script>
</head>
<style>
    .bg {
        width: 500px;
        overflow: hidden;
        margin: 0px auto;
    }


    .swiper-slide {
        height: 500px;
        width: 500px;
        background: pink;
    }

    .swiper-container {
        position: relative;
    }

    .swiper-pagination {
        display: flex;
    }

    .scroll_box {
        width: 100%;
        margin: 0 4px;
        height: auto;
        line-height: 0;
        display: flex;
    }

    .scroll_box.sssss .swiper-pagination-bullet {
        background: red;
    }

    .swiper-pagination-bullet {
        width: 100%;
        height: 10px;
        border-radius: 0px;
        margin: 0px !important;
        opacity: 1;
    }

    .swiper-pagination-bullet.demo {
        background-color: #ffffff;
        opacity: 1;
    }

    .swiper-pagination-bullet-active {
        background: black;
        opacity: 1;
        position: relative;
    }

    .swiper-pagination-bullet-active .scroll {
        position: absolute;
        width: 100%;
        height: 10px;
        background: red;
        top: 0px;
        z-index: 10;
    }
    .done_active .swiper-pagination-bullet{
        background: red;
    }

    .swiper-pagination-bullet-active .scroll {
        width: 0px;
        height: 10px;
        /* background: #ffffff;
        animation-name:progressbar;
        animation-duration:2s;
        animation-timing-function:linear;
        animation-iteration-count:1; */
    }


    /*
    .swiper-pagination-bullet-active+.scroll {
        position: absolute;
        height: 10px;
        top: 0px;
        width: 0px;
        height: 10px;
        background: black;
        animation: progressbar linear 6s 1 forwards;
    } */


    @keyframes progressbar {
        from {
            width: 0
        }

        to {
            width: 100%
        }
    }

    .btn-box {
        text-align: center;
    }
</style>
<body>
    <div>
        <div>
            <div>
                <div style="background-color: blue;">Slide 1</div>
                <div style="background-color: pink;">Slide 2</div>
                <div style="background-color: #f6f6f6;">Slide 3</div>
            </div>
            <div></div>
            <!--左箭头。如果放置在swiper-container外面,需要自定义样式。-->
            <div></div>
            <!--右箭头。如果放置在swiper-container外面,需要自定义样式。-->
            <div></div>
            <!--分页器。如果放置在swiper-container外面,需要自定义样式。-->
        </div>
    </div>
    <div>
        <button>暂停</button>
        <button>开始</button>
    </div>

</body>
<script>

    var mySwiper = new Swiper('.swiper-container', {
        loop: true,
        slidesPerView: 1,
        allowTouchMove: false,
        pagination: {
            el: '.swiper-pagination',
            clickable: false,
            renderBullet: function (index, className) {
                //使用renderBullet方法,重新初始化pagination结构
                return '<span><span data-index="' + (index) + '" class="' + className + '"><div></div></span><span></span></span>';
            }
        },
        navigation: {
            nextEl: '.swiper-button-next',
            prevEl: '.swiper-button-prev',
        },
        autoplay: {
            delay: 6000,//1秒切换一次
        },
        on: {
            slideChangeTransitionStart: function (swiper) {
                //swiper切换的时候触发scrollAnimate函数
                //this指代实例化的swiper对象
                scrollAnimate(this)
            },
            init: function (swiper) {
                //swiper初始化时触发scrollAnimate函数
                scrollAnimate(this)
            }
        }
    })

    //动画效果函数
    function scrollAnimate(data) {
        var index = data.realIndex
        $(".swiper-pagination-bullet-active .scroll").css("width", 0)
        //设置宽度为0,通过animate函数使宽度达到100%,实现填充效果
        $(".swiper-pagination-bullet-active .scroll").stop().animate({ width: "100%" }, 6000, "linear", function () {
            mySwiper.autoplay.start();
        })
        if (index <= data.slides.length - 3) {
            $(".swiper-pagination .scroll_box").each(function (index2, data) {
                if (index2 < index) {
                    $(".swiper-pagination .scroll_box").eq(index2).addClass("done_active")
                } else if (index2 == index) {
                    $(".swiper-pagination .scroll_box").eq(index2).removeClass("done_active")
                }
            })
        }
        if (index == 0) {
            $(".swiper-pagination .scroll_box").removeClass("done_active")
        }
    }

    //暂停
    $(".pause").click(function () {
        mySwiper.autoplay.stop();//停止自动播放
        $(".swiper-pagination-bullet-active .scroll").stop(); //暂停该标签的动画
    })
    //播放
    $(".start").click(function () {
        mySwiper.autoplay.start();

        var activeWidth = $(".swiper-pagination-bullet-active .scroll").width();
        //已经滑过的宽度

        var bgWidth = $(".swiper-pagination-bullet-active").width();
        //背景总宽度

        var afterTime = 6000 - (activeWidth / bgWidth) * 6 * 1000;
        //利用过渡时间- (已经滑过的宽度/背景总宽度) * 过渡时间 = 剩余宽度需要过渡的时间

        $(".swiper-pagination-bullet-active .scroll").stop().animate({ width: "100%" }, afterTime, "linear", function () {
            //过渡结束后,直接跳到下一帧,然后开始自动播放
            //------------->这样处理可以避免时间计算出现问题
            mySwiper.slideNext();
            mySwiper.autoplay.start();
        });
    })

    //点击前往下一帧
    $('.swiper-button-next').click(function () {
        mySwiper.slidePrev();
        mySwiper.autoplay.start();
    })

    //点击前往上一帧
    $('.swiper-button-prev').click(function () {
        mySwiper.slideNext();
        mySwiper.autoplay.start();
    })
</script>

</html>

首先我们需要明白swiper 想要速度的效果是需要用到 transition-timing-function: 这个参数的 其次需要配合speed:1200,使用 lin

最后一屏底部自动高度的方法为 slidesPerView:auto, css代码 .foot{height:auto!important;} 但是这种情况会出现滚动到最后一屏的

slidesPerView:1,autoplay:3000,direction:vertical,grabCursor:true,autoplayDisableOnInteraction:false,mousewheelControl:true,autoHeight:true,//重点就是

直接鼠标hover模拟click即可! $(.swiper-pagination-bullet).hover(function(){$(this).click();//鼠标划上去之后,自动触发点击事件来

swiper嵌套的swiper怎样实现鼠标滚动切换,当嵌套的切换完之后,在继续切换外面的swiper !DOCTYPEhtml!--savedfromurl=(0044)ht
